Whoops - it has been a little longer than planned between "From the Boathouse" articles. We'll come back and pick-up on the "The Wire that Binds" article series in a later entry, but with Summer upon us it is too hot to be digging in the console or bilge to rewire things, and with water temperatures increasing not only on the surface, but at depths, I thought I'd cover a little project I just recently completed.
Keeping cool water in your bait tank is a critical factor in keeping quality bait during the summer months. I generally like to keep my bait tank in the mid-60's to low 70's range when keeping alewives. Ideally you want your bait holding in water that is no more than a few degrees, maybe 5, from the temperature at the depth that the bait is being pulled from, or where you will be suspending it when fishing. If you pay attention to the depths where you mark schools of alewife, you'll typically see them holding from 20-40 feet (or even deeper). Ever notice how you have to catch bait at deeper water lights as the summer progresses and water temperature increases - it has everything to do with the bait pulling back to levels with more comfortable water temperatures (as long as those levels how sufficient dissolved oxygen - but that's a whole other article).
If you have a deep-water well at home, you can fill your tank will well water, but check the temperature as the well water may actually be too cold and you'll need to temper it with some warmer, lake surface water to get the right balanced temperatures. Another thing to watch out for with well water that many have experienced is often water pulled from deep-water wells if low in oxygen, and if you fill the tank and immediately put bait in the tank they may suffocate from lack of oxygen. Therefore, it is always a good idea to run your aerator on the tank for a while before adding bait to a newly filled tank if using well water. Also, to be clear, we are talking about UN-CHLORNATED well water here - city or community water and your bait do not mix unless you first treat it with a de-chlorinator chemical.
OK, but what if you do not have access to a deep-water well at your house or boat dock, so how can you get cool water for the tank? One way is to fill the tank with lake surface water and then cool it down with ice. If you use ice be sure that you use dechlorinated-water based ice. You can by bagged ice at plenty of places around the lake - "Hometown Ice", found around the Smith Mountain Lake are has proven safe, but at $2 per 10 lb bag, this can begin to get costly. In my 40 gal SuperBait Tank II tank, a 10 lb bag of ice will bring the water temp down somewhere around 3-5 degrees. So, if I use surface water that is 80-85 degrees then I'll need at least 20 lbs of ice just to get the tank down to where I want the temperature to be BEFORE I put bait in - much less the ice needed to supplement in the tank throughout the day if I am keeping bait across a weekend.
If you don't fancy all that store-bought ice and want to ensure you have "safe" water, you can also freeze lake water by filling some soda bottles or tupperware to freeze blocks of ice and then putting the blocks of ice and/or floating the bottles in the tank, but this creates the hassle of filling your containers, freezing them in a deep-freezer, and then transporting the ice to your tank.
Isn't there an easier way that prevents lugging around coolers full of ice? Well, we want to keep our tank water around the temperature that our bait is coming from - so somewhere down there is water that is of the temperature that the bait likes, so why don't we just use that? The good news is we can - we just have to reach a ways down there to get it.
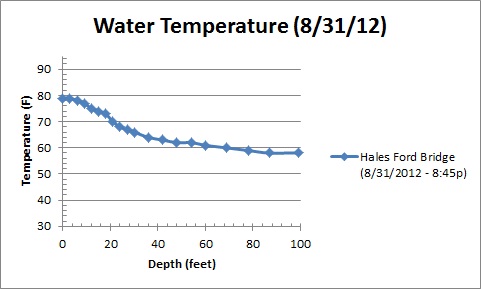
When looking at a few of our water temperature measurements, we can see the contrasts in the temperatures across a depth profile from early June to late August - not only does the upper layer of water warm, but the lower depths also warm well into the 60's by late summer.
Keeping cool water in your bait tank is a critical factor in keeping quality bait during the summer months. I generally like to keep my bait tank in the mid-60's to low 70's range when keeping alewives. Ideally you want your bait holding in water that is no more than a few degrees, maybe 5, from the temperature at the depth that the bait is being pulled from, or where you will be suspending it when fishing. If you pay attention to the depths where you mark schools of alewife, you'll typically see them holding from 20-40 feet (or even deeper). Ever notice how you have to catch bait at deeper water lights as the summer progresses and water temperature increases - it has everything to do with the bait pulling back to levels with more comfortable water temperatures (as long as those levels how sufficient dissolved oxygen - but that's a whole other article).
If you have a deep-water well at home, you can fill your tank will well water, but check the temperature as the well water may actually be too cold and you'll need to temper it with some warmer, lake surface water to get the right balanced temperatures. Another thing to watch out for with well water that many have experienced is often water pulled from deep-water wells if low in oxygen, and if you fill the tank and immediately put bait in the tank they may suffocate from lack of oxygen. Therefore, it is always a good idea to run your aerator on the tank for a while before adding bait to a newly filled tank if using well water. Also, to be clear, we are talking about UN-CHLORNATED well water here - city or community water and your bait do not mix unless you first treat it with a de-chlorinator chemical.
OK, but what if you do not have access to a deep-water well at your house or boat dock, so how can you get cool water for the tank? One way is to fill the tank with lake surface water and then cool it down with ice. If you use ice be sure that you use dechlorinated-water based ice. You can by bagged ice at plenty of places around the lake - "Hometown Ice", found around the Smith Mountain Lake are has proven safe, but at $2 per 10 lb bag, this can begin to get costly. In my 40 gal SuperBait Tank II tank, a 10 lb bag of ice will bring the water temp down somewhere around 3-5 degrees. So, if I use surface water that is 80-85 degrees then I'll need at least 20 lbs of ice just to get the tank down to where I want the temperature to be BEFORE I put bait in - much less the ice needed to supplement in the tank throughout the day if I am keeping bait across a weekend.
If you don't fancy all that store-bought ice and want to ensure you have "safe" water, you can also freeze lake water by filling some soda bottles or tupperware to freeze blocks of ice and then putting the blocks of ice and/or floating the bottles in the tank, but this creates the hassle of filling your containers, freezing them in a deep-freezer, and then transporting the ice to your tank.
Isn't there an easier way that prevents lugging around coolers full of ice? Well, we want to keep our tank water around the temperature that our bait is coming from - so somewhere down there is water that is of the temperature that the bait likes, so why don't we just use that? The good news is we can - we just have to reach a ways down there to get it.
When looking at a few of our water temperature measurements, we can see the contrasts in the temperatures across a depth profile from early June to late August - not only does the upper layer of water warm, but the lower depths also warm well into the 60's by late summer.

| 
|
Why not put together a pump and hose setup that let's us get down to that cold water and fill our tank. I have used this technique to fill my tank since I started striper fishing, and my initial pump rig consisted of a 500 or 800 gph bilge pump connected to a 25' garden hose, powered with alligator clips off my cranking battery. This setup worked, though a bit slow (on the order of 15 minutes to fill my 40 gal tank) and it did not allow me to get to sufficient depths during the summer, so I would have to augment with ice to cool the water down to a sufficient temperature. At one point I made a similar rig with a 50', 5/8" garden hose and a Rule 1100 gph pump, but this took FOREVER to fill the tank due to the flow restriction from the friction of the water flow through 50' of narrow hose.
This summer I vowed to make "the right" deep water rig - I recently assembled this setup and now am able to fill my 40 gal tank through 40' of hose in under 4 minutes.
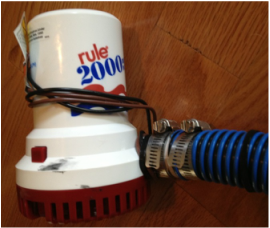
This new deep-water pump rig consists of a Rule 2000 gph bilge pump and two sections of 1-1/4" pool vacuum hose, and assorted fittings and wire. You could also use a 1100 or 1500 gph pump - each have 1-1/8" fittings which would work with the build procedure described below - you'll just have slow tank fill/drain times (though you should see considerable improvement over the use of 5/8" garden hose).
This new deep-water pump rig consists of a Rule 2000 gph bilge pump and two sections of 1-1/4" pool vacuum hose, and assorted fittings and wire. You could also use a 1100 or 1500 gph pump - each have 1-1/8" fittings which would work with the build procedure described below - you'll just have slow tank fill/drain times (though you should see considerable improvement over the use of 5/8" garden hose).
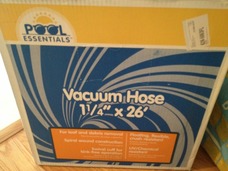
For my build, I purchased two, 26', 1-1/4" pool vacuum hoses from Wal-Mart. You can also find similar hoses at Lowes, Home Depot or various sources on-line. In comparing the hoses offered in-store at Wal-Mart to that at Lowes & Home Depot, the Wal-Mart offering was a few dollars cheaper, a few feet longer and appears to have smoother lining inside the hose, which helps to reduce friction experienced by the water flowing through the hose. Corrugated bilge hose can also be used, but it is generally flimsier, more likely to kink and is ribbed on the interior, thus reducing flow, and harder to obtain in long lengths.
In order to reach mid-60's water at the hottest periods of the year, water needs to be pumped up from around 30-35'. Taking into account the distance the hose has to travel out of the water, over the the boat gunnel and to the tank, a total length of around 40' was required. I cut one section of hose to around 14'-15' to give me a total length of about 40' when the two sections of hose were joined. This also gives me a few options that I can use to assemble the hose to different lengths throughout the year to reduce the bulk of hose stored on the boat when the full lengths are not needed.
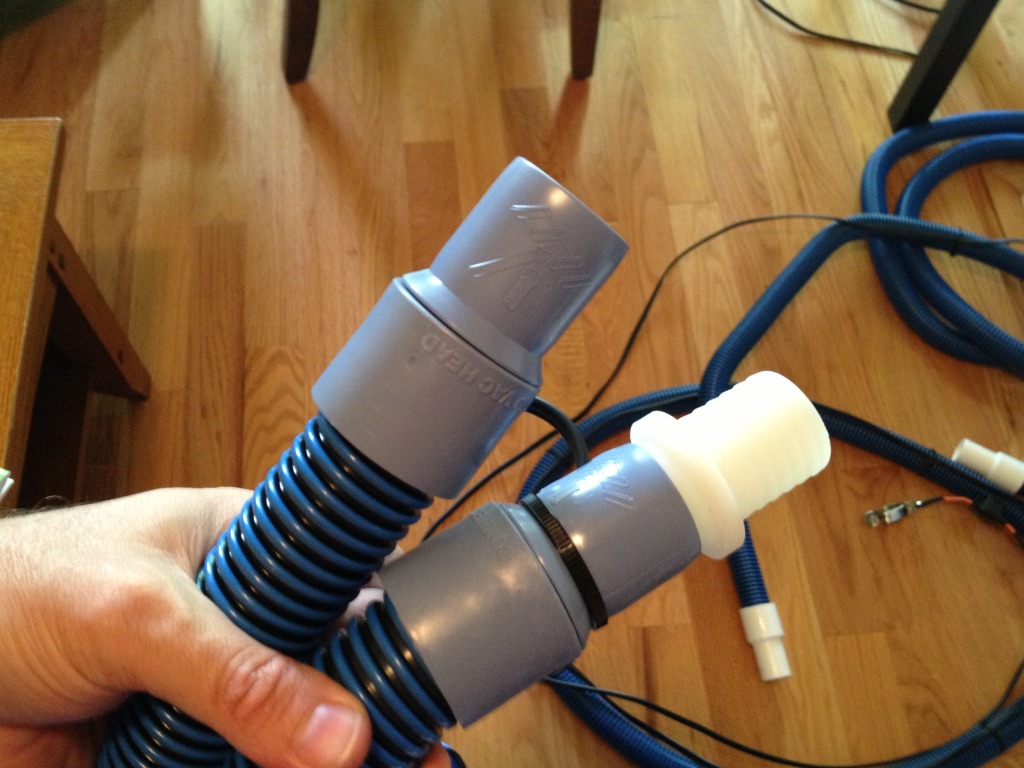
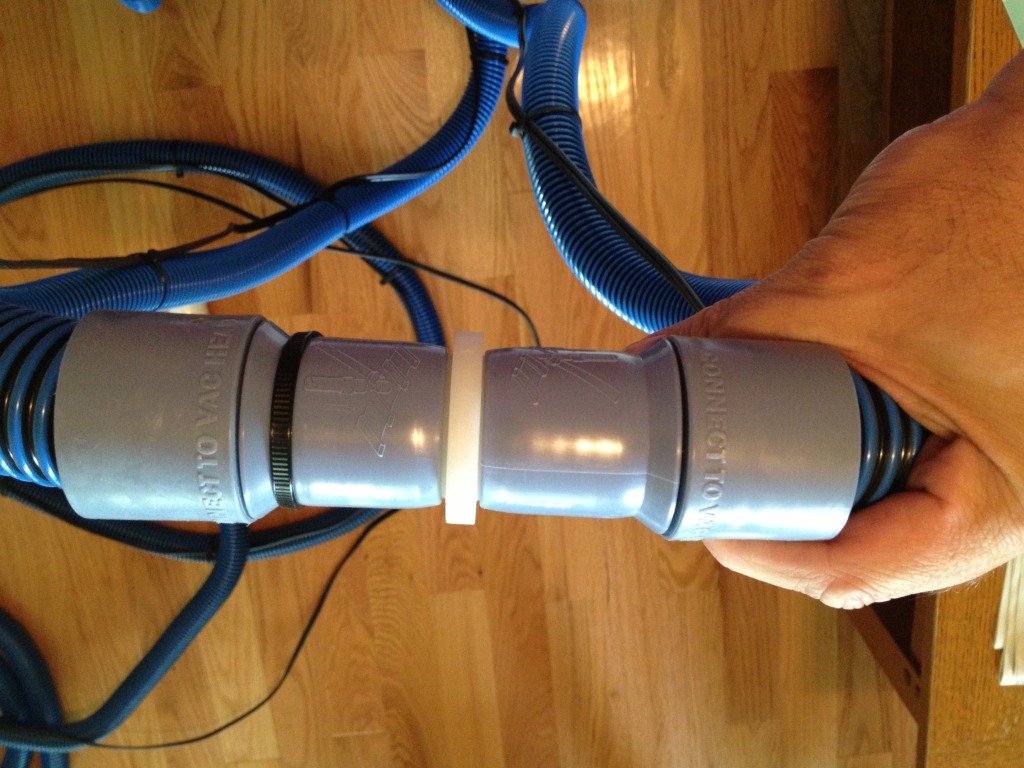
The hose is joined with a 1-1/4" x 1-14" male bard to male barb fitting that can be found in the plumbing section of your local home improvements store. With the hoses I used, the barb fittings were tight enough that hose clamps are not needed, though over time they may be.
The hose is joined with a 1-1/4" x 1-14" male bard to male barb fitting that can be found in the plumbing section of your local home improvements store. With the hoses I used, the barb fittings were tight enough that hose clamps are not needed, though over time they may be.
| 
|
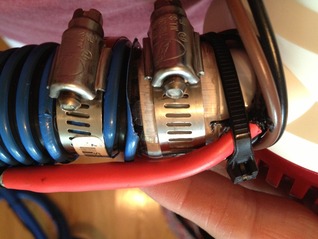
The next challenge in assemble was how to mate the 1-1/4" interior diameter (I.D.) vacuum hose to the 1-1/8" outside diameter (O.D.) fitting on the Rule bilge pump. The difference in size was too large to slip on and clamp, but this was solved by using a 4"-5" section of 1" I.D. / 1-1.4" O.D. clear PVC tubing. With a little persuasion (and if needed a little easing with a heat-gun), the tubing could be slid on the pump fitting, and then it fit nicely inside the factor fitting on the vacuum hose. A stainless-steel hose clam on each side and we have a nice, tight union.
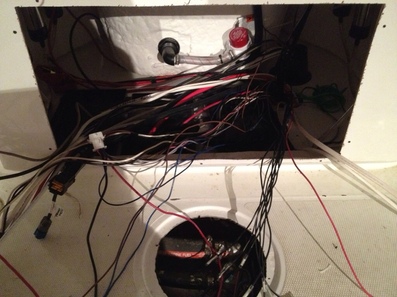
All that is left is to wire the pump for its power source. For now, I decided to use clips that I can attach to my cranking battery like I have used previously - though I may change this out in the future and use a plug/socket such as would be used with a trolling motor, and place a more permanent mount point on the boat, and connect into a physical switch.
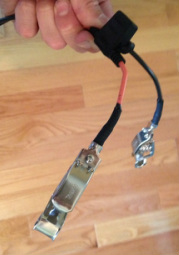
While I generally only use tinned marine wire in my boating applications, I had 50' of wire that I had used on my previous deep-water pump, so I decided to re-use this. It is 14 gauge, which is the minimum size I would recommend given the distance to minimize voltage drop to the pump and the current load the 2000 gph pumps pulls. Heat-shrink crimp connectors where used to join the bilge pump wiring to the extension wire, but to ensure its integrity against water intrusion, I coated the ends of each connection with liquid "electrical tape" and then applied a length of heat-shrink tubing over the connector, and applied more liquid tape over the ends of the heat-shrink tubing. Finally, a water-resistant, in-line blade fuse holder was installed on the positive power lead just after the battery clip to install the 15 amp fuse (the recommended fuse size for the pump - which pulls 7-8 amps).
Finally, zip-ties were used every foot to hold the wire to the hose (and to provide a reference point to measure depth) and the rig was ready to put to its 1st test run. The results were a success with the the pump filling my 40 gallon Super Bait Tank II in under 4 minutes - I'll actually have to keep an eye on the tank fill from now on vs. fiddling around with re-tying my lines or other tasks when preparing the boat. While the pool hose will float, the weight of the pump is sufficient to pull the hose down without it floating up ensuring the pump is pulling from its full, desired depth.
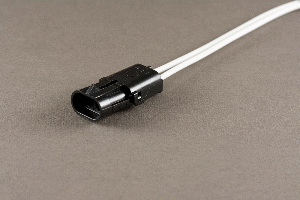
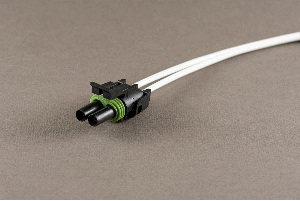
Earlier in the article I mentioned cutting down one 26' foot section of hose into a 14' and 12' section. This gives me some options to configure the pump with a hose that is 14', 26', 40' or 52', as needed. However, I need an easy way to extend or shorten the wire to match the length of the hose. I ran across a source for some watertight Delphi connectors that are of suitable wire gauge & amperage, and they even have them pre-assembled in a harness so that I do not have to acquire the proper crimping tool. I like the Deutsch connectors better, but given these are available pre-assembled, they will do. I plan to order a few sets and install female and male end on each section of hose so that I can connect/disconnect the various lengths of hose as needed, allowing me to have the right length of hose through the different times of year, without having to manage the bulk of the full length on the boat year-round.
Earlier in the article I mentioned cutting down one 26' foot section of hose into a 14' and 12' section. This gives me some options to configure the pump with a hose that is 14', 26', 40' or 52', as needed. However, I need an easy way to extend or shorten the wire to match the length of the hose. I ran across a source for some watertight Delphi connectors that are of suitable wire gauge & amperage, and they even have them pre-assembled in a harness so that I do not have to acquire the proper crimping tool. I like the Deutsch connectors better, but given these are available pre-assembled, they will do. I plan to order a few sets and install female and male end on each section of hose so that I can connect/disconnect the various lengths of hose as needed, allowing me to have the right length of hose through the different times of year, without having to manage the bulk of the full length on the boat year-round.
| 
|

 RSS Feed